Configure Textkernel Search and Match indexing🔗
In this section we discuss how to configure the indexation process to synchronize data from Salesforce into the Textkernel environment to enable searching and matching. This also discusses mapping your Salesforce data model to the Textkernel search data model.
Indexation Architecture🔗
Standard (push) indexation🔗
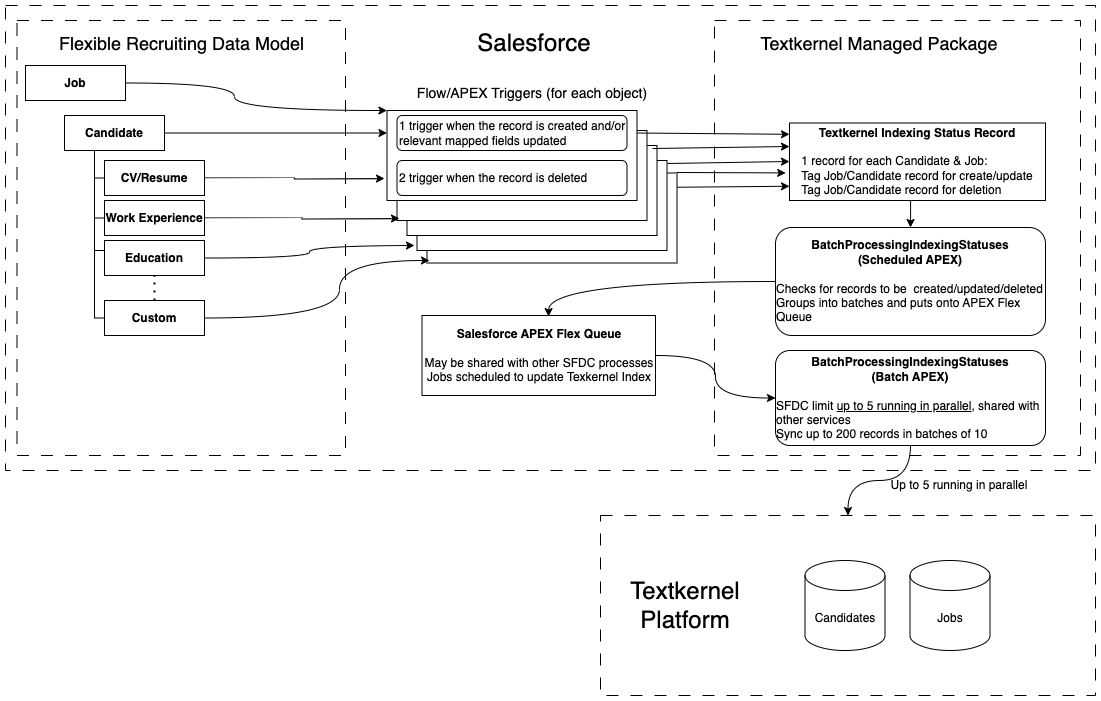
The diagram below summarizes the elements of the push integration architecture. The benefit of this architecture is that it is very flexible and makes very few assumptions about the Salesforce recruiting data model. It also does not make inbound requests to Salesforce REST APIs. However it has throughput constraints because it shares the APEX Flex queue with other users inside the Salesforce org, and Salesforce limits the number of parallel threads to 5.
The configuration of the core search indexation has 3 parts:
- Configure the data model mapping: You need to map your specific Salesforce data model for Candidate and Vacancies into the Textkernel search index. This mapping is configured in the admin panels of the managed package.
- Configure the triggers: When changes happen inside Salesforce side, you need to sync them to the Textkernel search index. These triggers can be setup in Flow or Apex, depending on your preference. This is configured in Salesforce's admin setup outside of the managed package.
- Configure the credentials and indexation frequency: You need to provide credentials to access your Textkernel index, and define how often to check for changes and sync them into the Textkernel Search index. This is configured in the admin panels of the managed package.
High-throughput (pull) indexation🔗
For enterprise customers with a very large index and a high volume of changes to index, the standard feature may not be fast enough to sync the data to Textkernel. For those customers, we offer the high-throughput indexation (HTI) feature as an option. Rather than pushing updates out of Salesforce to Textkernel, with HTI, the Textkernel platform pulls data out of the Salesforce REST APIs into the Textkernel index. Using the REST APIs lets the indexation process achieve much higher throughput through greater concurrency, and elminates our need to share Salesforce's APEX Flex queue with other processes.
Most of the setup procedure is the same for standard indexation and the HTI. Each section has a note to explain which part is relevant for which feature. Towards the end of the setup, there are specific sections with some different configuration procedures.
Important
Unlike standard push indexation, the high-throughput pull indexation feature makes api calls into Salesforce. Based on your Salesforce license and user count you have a limited daily allocation of API calls. The indexation usage can be tuned, but it can be quite heavy, so you should monitor your usage.
Note that you can only run either the standard indexation or the HTI, but not both at the same time.

Setup indexing status, record filtering, and data access control🔗
Note: relevant for both standard indexation and HTI
-
Configure Textkernel indexing status custom object
On the Textkernel indexing status custom object, add lookup fields to the primary Candidate and Vacancy objects for your data model. This relationship links Textkernel indexing status records to Candidates and Vacancies. These records maintain indexation status information. The records track which Candidate/Vacacny records are up to date in the Textkernel index, which are waiting to be indexed to Textkernel and/or which records had indexing errors (e.g. because of an unparseable CV).
Go to SFDC Setup → Object Manager → Textkernel Indexing Status, and then create the 2 Lookup relationships.
-
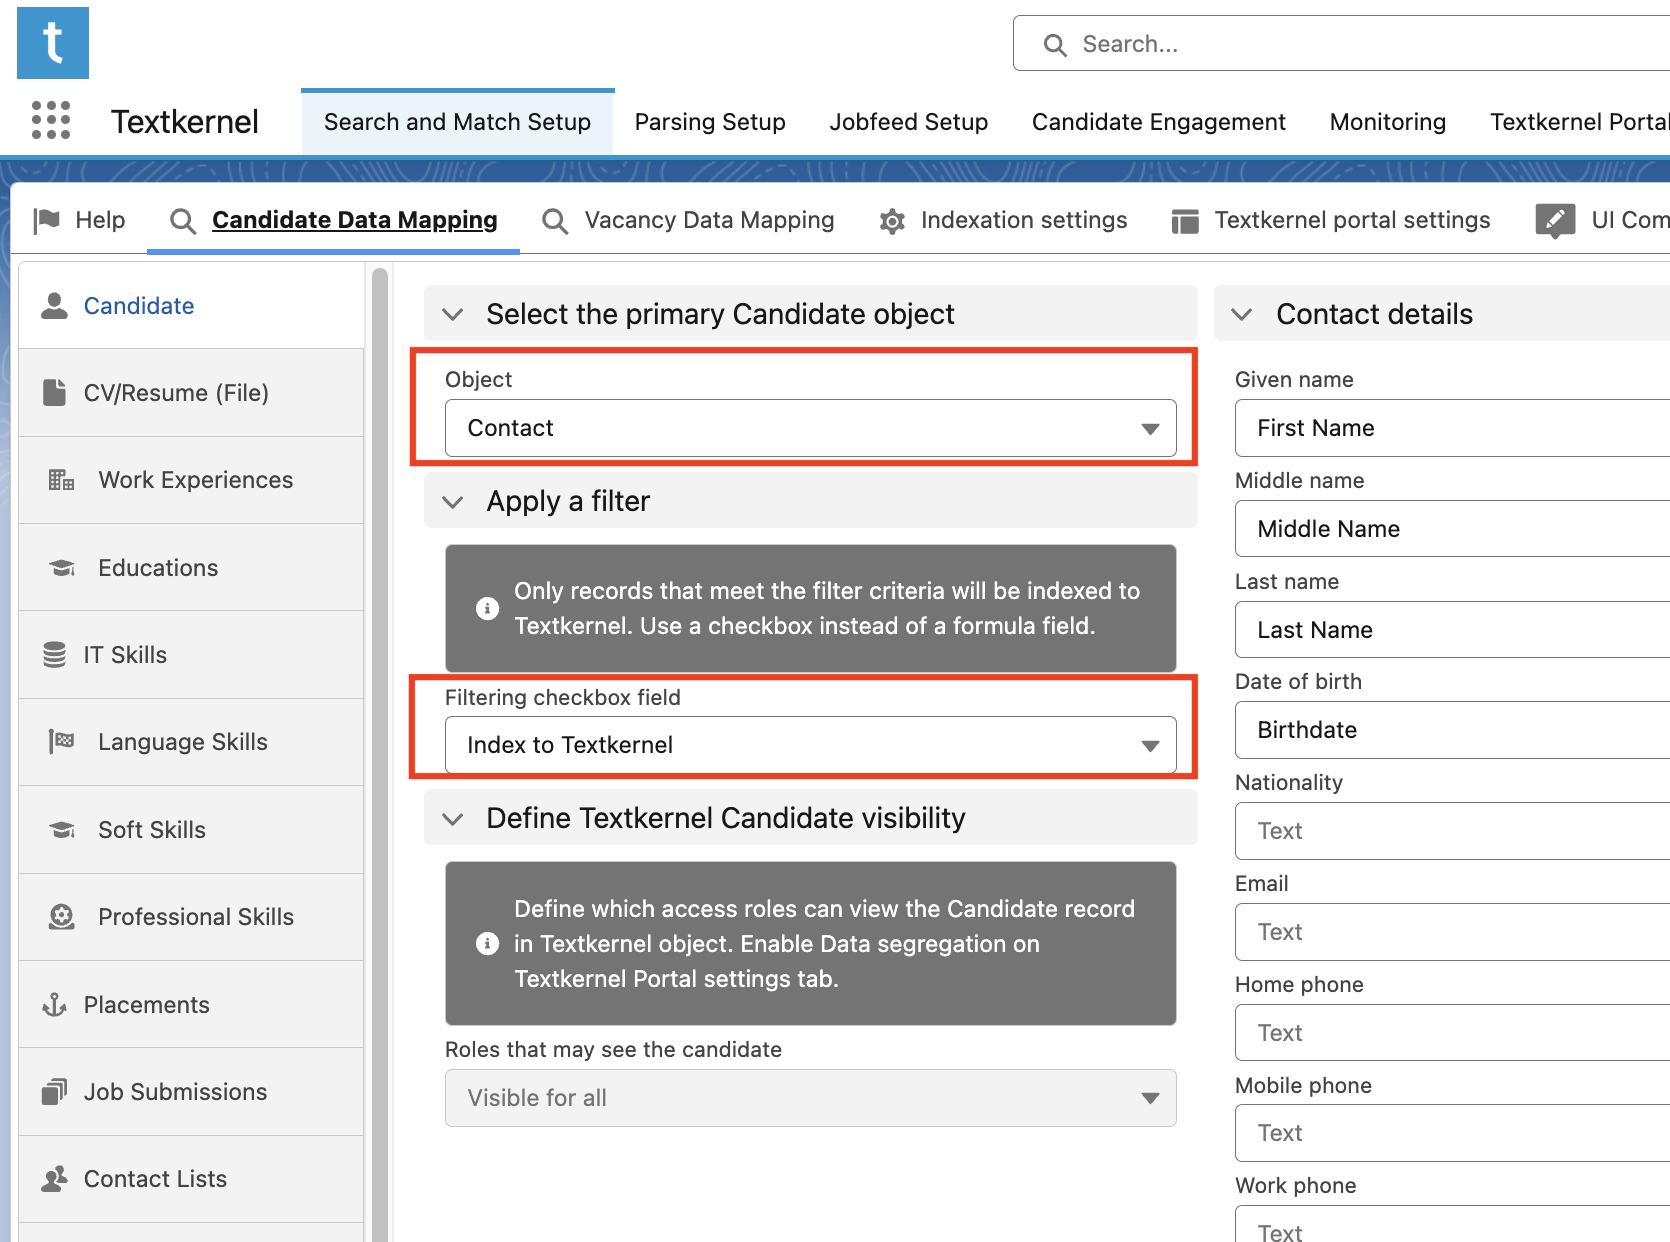
Define a filtering checkbox field (Boolean) to define the subset of records to be indexed
Usually, not all records are copied from Salesforce into the TK Index for search and match. For example, perhaps only active Vacancies should be stored in the Index, or perhaps any Candidates which have not given recent marketing consent need to be excluded. To support this, you should create a Boolean checkbox field that stores a boolean
Trueif the Candidate/Vacancy record should be indexed, and otherwise returnsFalse. Once those fields have been created, you should assign them in the data mapping. The filtering field can be defined for each related object in your data model (ie, not just Candidate, but related Work Experience, Education, etc).Important
A Salesforce Formula field cannot be used as the filter, because a state change on a formula field does not activate a trigger (setup in Salesforce via Flow or APEX). For indexation to work properly, it is important to detect each state change on this filtering checkbox field. So, as part of your implementation, you should implement logic (eg with Flow or Apex Trigger) that sets this Boolean checkbox field to the desired state.
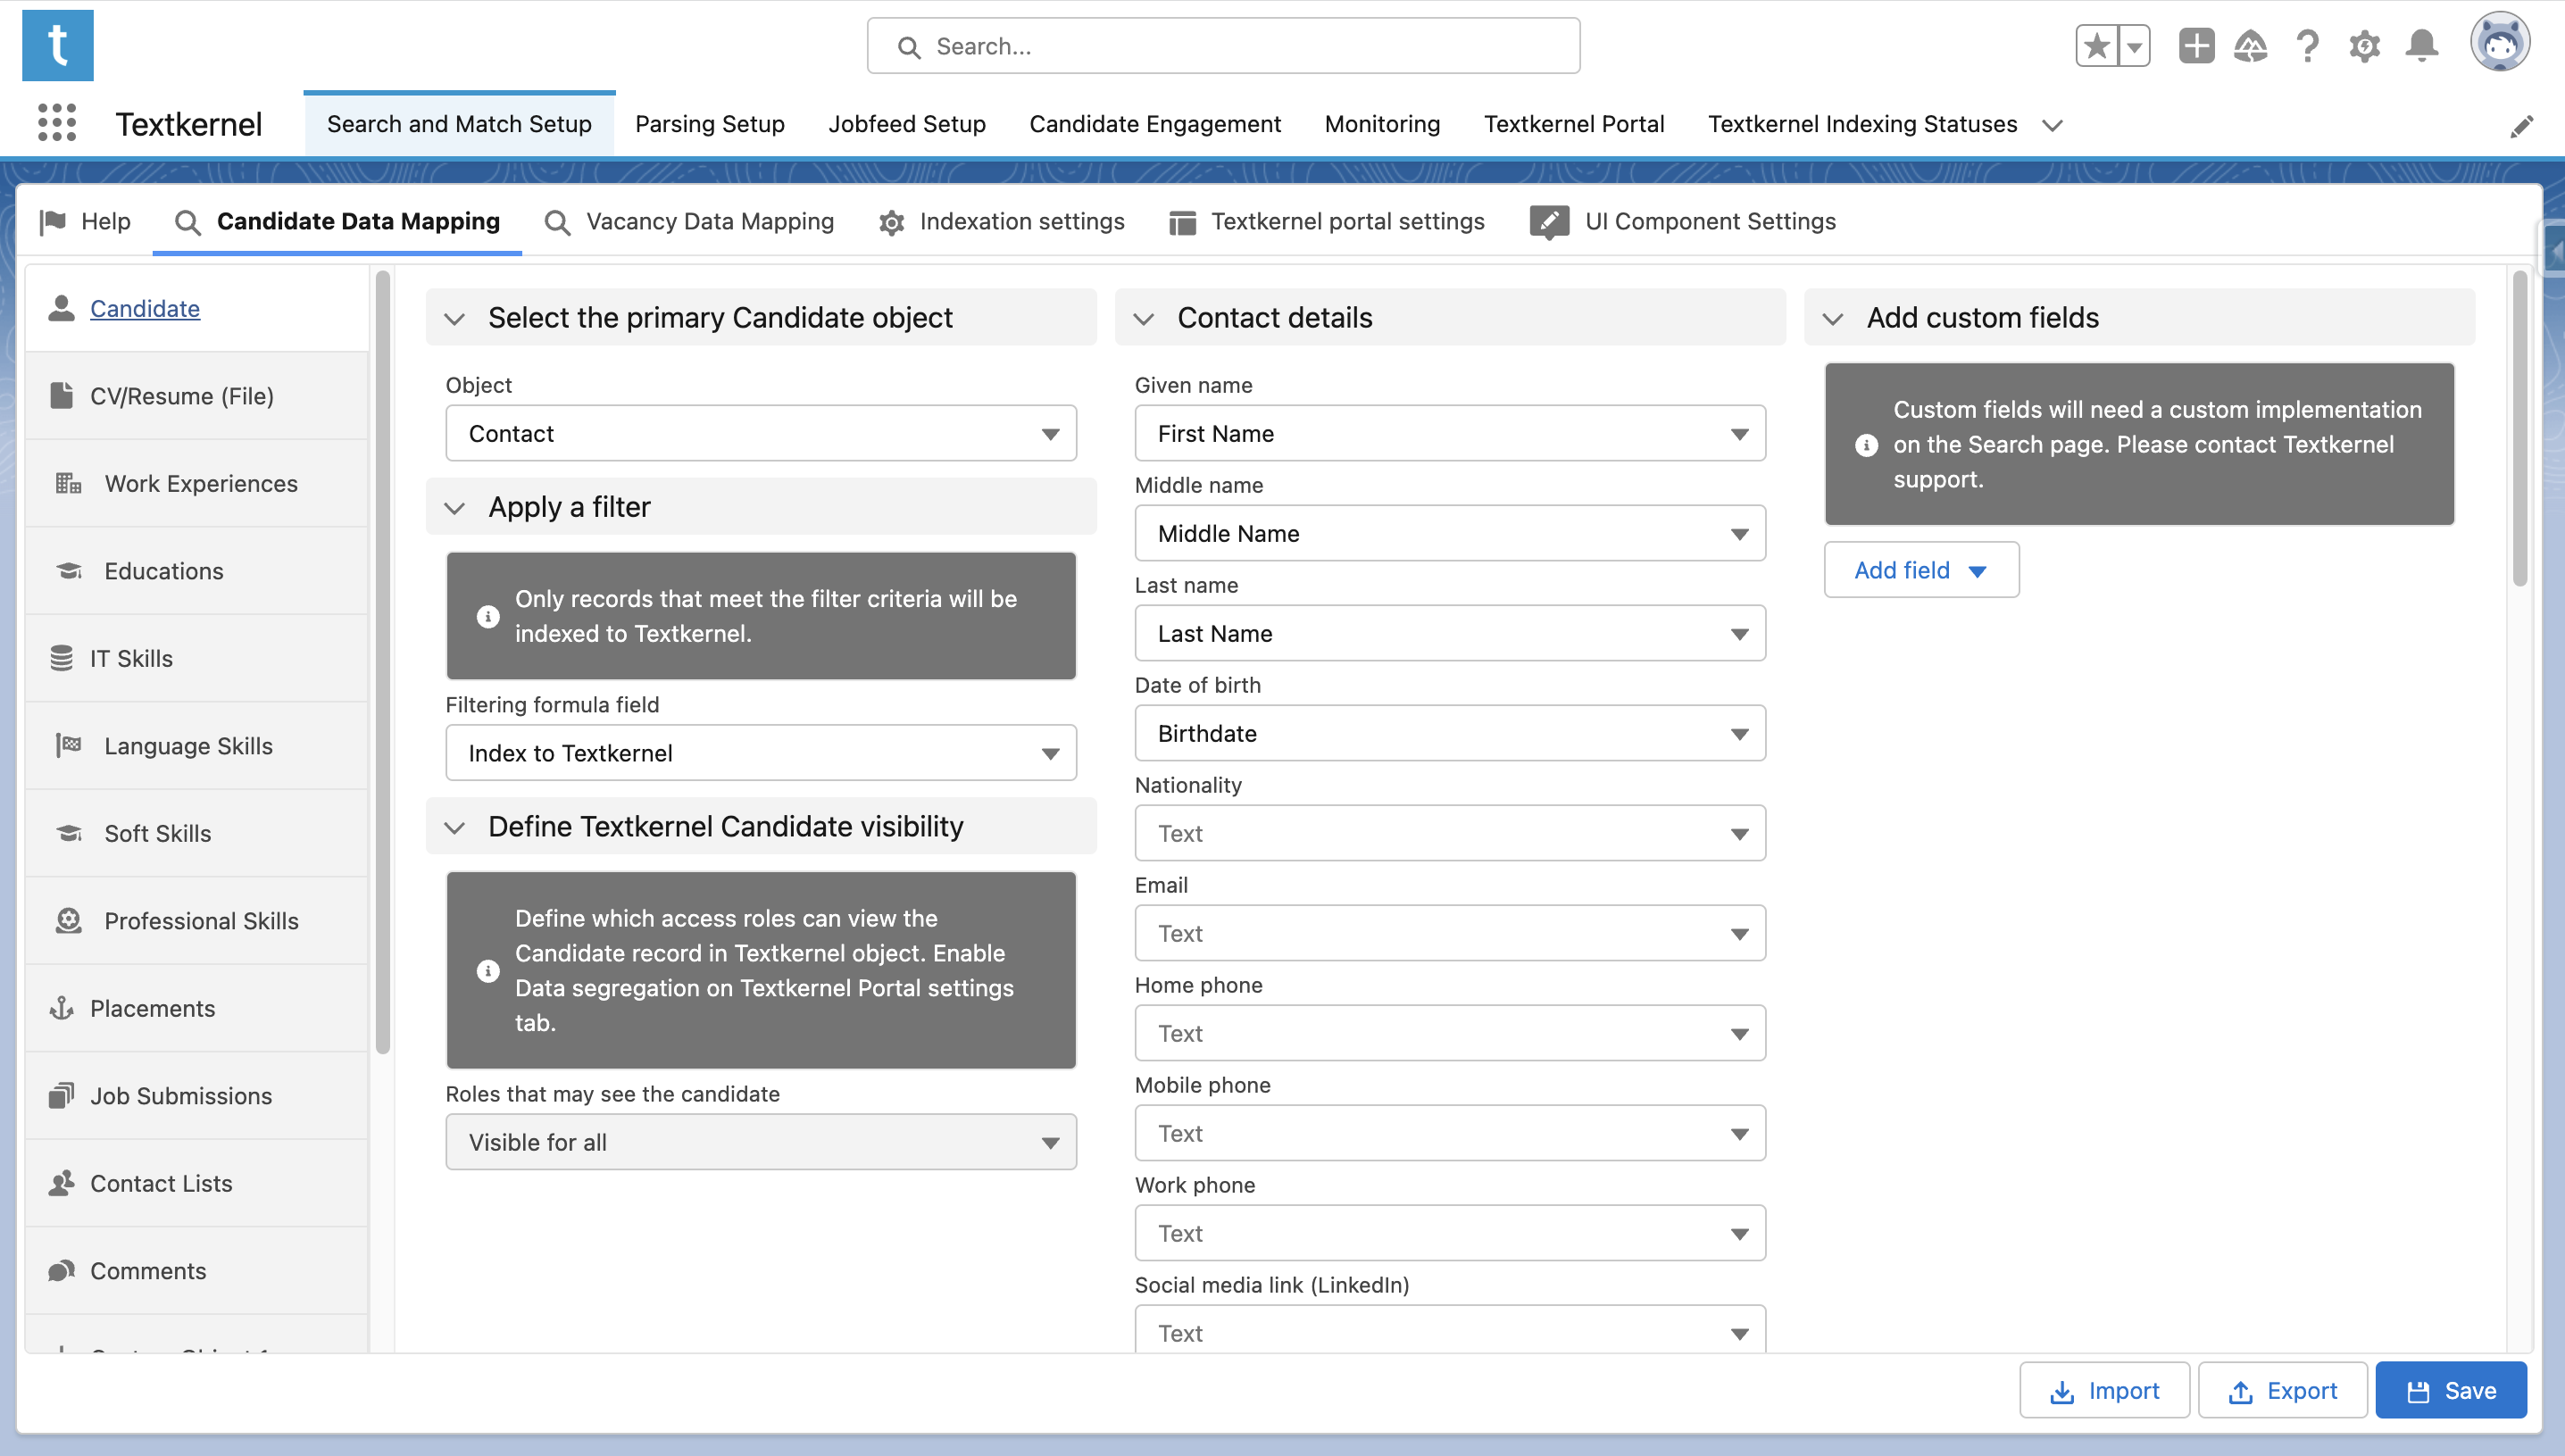
As an example: in the image, all Candidates are stored on the Contact object. We use the custom Boolean filter “Index to Textkernel” to control which Candidates should be indexed. We select this field in the “Filtering checkbox field” field on the Candidate Data Mapping tab of the Textkernel setup tab. With this configuration, only Candidate records whose field "Index to Textkernel" evaluates to True will be indexed to Textkernel.
-
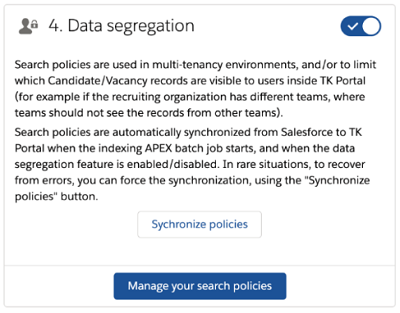
(Optional) Define data-segregation roles
You may want to restrict access to the Candidates/Vacancies in the TK Index, so that recruiters only see the relevant set of Candidates and Vacancies for their particular responsibility (i.e. not all records are visible). If so, you should follow the steps in this section. If you don’t use this option, then all Candidates and Vacancies will be visible to all Recruiters.
-
Enable Data Segregation on the Textkernel portal settings page of the App.
-
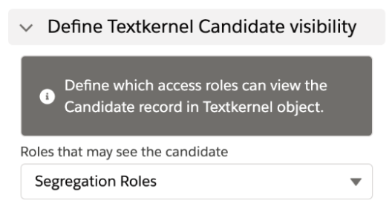
When the feature is enabled, then you will also see the option to Define Textkernel Candidate Visibility on the Candidate Data Mapping page and Define Textkernel Vacancy Visibility on the Vacancy Data Mapping page.
- Using the Object Manager, add a custom multi-select picklist field to the primary Candidate and Vacancy objects. The custom field lists all of the possible access roles that you want in your Textkernel index (only Salesforce users which are also assigned one of these access roles for the record will be able to view the record in the Textkernel search results).
-
Select the relevant field under Define Textkernel Candidate Visibility. In the example setup, the field name is Segregation Roles.
-
Define the global list of possible access roles. The multi-select picklist fields controlling the access must use the global value set Textkernel access roles, which is included in the package. You need to list all of the possible access roles you want, and add them to this global value set. In the examples, the custom field Segregation Roles (which is used on the primary Candidate and Vacancy objects) always uses this global value set. IMPORTANT: access roles must conform to the following regular expression format:
[A-Za-z0-9]+.Go to SFDC Setup → Picklist Value Sets, and add a Global Value Set.
-
Create sets of Textkernel Search Policy records on the Textkernel Search Policies tab. You should create a search policy for each type of user profile you want in your Textkernel index search results. Each search policy contains a set of access roles which a Salesforce User should see when viewing Search results. IMPORTANT: the API name of the Search policy must conform to the following regular expression format:
[A-Za-z0-9_]+. - Link your Salesforce users to the relevant search policies using the Textkernel Search Policy of User object. To do this, open the Textkernel Search Policy Record which you want to associate with Users. On the Related tab, you see a list of all the Search Policy of User records using this search policy. You should create a new record linking each Salesforce User to the appropriate search policy. When this is setup, you will see the linked Salesforce Users listed under the Related tab.
-
As part of your Salesforce environment integration with Textkernel, you should add automation to:
- assign the appropriate access role(s) to the Candidate record when they are created
- assign the appropriate access role(s) to the Vacancy record when they are created
- auto-create the Textkernel Search Policy of User records when new Salesforce Users are created.
Important
These custom fields control visibility of records in the Textkernel search results, but they don’t impact the access control to Objects inside your Salesforce environment. If you want the user to have similar access rights, when you automate the management/creation of Search Policy of User, you should build a workflow that derives the search policies from your preferred Salesforce access control mechanism.
-
Map Candidate data🔗
Note: relevant for both standard indexation and HTI
The Candidate Data Mapping page allows you to map your customized Salesforce data model onto the core Textkernel Candidate indexation model. Textkernel’s Candidate data model is flexible and supports custom fields as well as a range of adjustable relationships. For each primary object and related object in the data model, there are a set of custom fields of different data types available. You can map your custom environment data fields into these fields to make them available in your search results.
On the left-hand side of the page, selectable tabs control which object's field mapping controls are currently active (Candidate, Work Experience, Education, Vacancy, etc). As you select the different tabs, the relevant fields are shown in the UI.
-
Primary Candidate object
The first tab to configure is Candidate. Candidate is the root object, so all other objects displayed on the other Tabs of this page are related to the primary Candidate object. Select the root Candidate object in the primary Candidate object section.
-
You typically also filter records that should be indexed to Textkernel. To do this use Filtering formula field to select the Boolean formula field that returns true when a Candidate should be indexed. Only records that meet the filter criteria will be indexed to Textkernel. (See section 2 of Configure Textkernel App for more information on the requirements for the filtering field).
-
If you are using data segregation, you will also select the field controlling who has access to the Candidate records using the field Roles that may see the candidate (see section 3 of Configure Textkernel App for more information).
-
Now map the rest of your preferred fields into the available fields in the Textkernel Candidate data model. You can also use custom fields if necessary. Remember to use Save to store the mapping. (Note: whenever you change the Candidate object it will reset all the dependent fields across all related objects, so make sure you have selected the intended object).
-
After you define the mapping for the primary Candidate object, proceed to map the relevant related objects and their fields from your data model into the standard Textkernel Candidate data model, too. Select the related objects using the bar on the left-hand side of the screen.
-
The first related object you will configure is the CV/Resume (File) tab
-
CV/Resume file Option 1: Often, the CV/Resume (File) is saved as a File related to the root Candidate object. In this scenario, the main configuration is to select a custom filtering function for the CV file. There could be multiple files or different types attached to a Candidate (e.g. different submitted CV versions, and potentially other document types such as a cover letter). The filtering function should return a Boolean True value for whichever file is the one master CV document version that you want to store in the Textkernel index.
-
CV/Resume file Option 2: In some cases, the CV/Resume (File) is not linked directly to the primary Candidate object, but to a related object, instead. If this is your data model style, select the checkbox File or Attachment linked to related object. This displays the relevant settings for that model. If the related records should be filtered, create a boolean formula field that returns “True” to indicate which single CV record should indexed (for example, you might have different types of related content records like a CV, cover letter, and other document types). In this case, select this field in Apply a filter section. There could also be multiple content versions for the file attached to the related record, so you may also need a 2nd filter to handle that and indicate which content version you want to retrieve.
-
CV/Resume file Option 3: In some unusual cases, your environment might use the older Attachment object instead of the File object to store CV files. This is only possible if the Attachment is linked to a related object, as in Option 2. If this is the case, please set things up as in Option 2, but also select the checkbox: Use Attachment instead of File Object.
Info
ContentVersion is Salesforce's recommended File object for use with Salesforce Lightning UI. The older Attachment object for Files is not fully supported by Salesforce in Lightning. Attachment support in this integration is limited because there is no way to distinguish between multiple Attachments to indicate which File should be indexed.
-
-
Most of the remaining tabs relate to Candidate data which are typically defined as objects relating to the primary Candidate record, like Work Experiences, Educations, Placements, Job submissions, Contact Lists, Comments, Skills.
For each of these related objects:
- Select the appropriate object related to the primary Candidate object
- Select a filtering formula field to define which records should be indexed
- Map fields into the default Textkernel data model
- Add custom fields, if needed, which are not part of the default Textkernel data model
-
(Optional) If you want to index other custom objects related to the Candidate in your data model, there are 5 additional custom object relationships that are supported.
Skills data model mapping🔗
Textkernel supports 4 different skills categories in its standard data model:
- IT Skills
- Language Skills
- Soft Skills
- Professional Skills
This means there are multiple possible approaches for mapping the skills data model:
-
Option 1 "Separate skills objects for each skill type": with this mapping, there is a separate related Skills object for each of the 4 types of Textkernel skill. So, you define the relationship to each of the Skills objects, define relevant filtering criteria, and map the fields into the Textkernel data model for indexing.
-
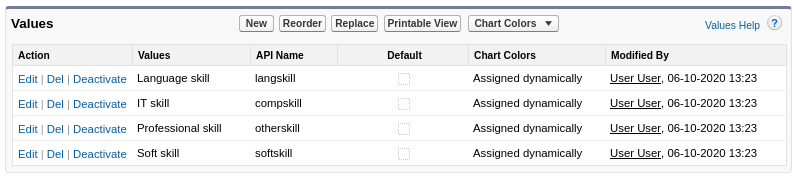
Option 2 "Single skill object for all skill types": in this data model, there is one Skill object which merged each of the 4 Textkernel skill types mapped into one. To use this data model, in addition to the Skill object, you should also create 2 types of custom fields on the skills object:
-
First field type: a single picklist to define the skill type. The picklist values should be:
- Language skill (API - langskill)
- IT skill (API - compskill)
- Professional skill (API - otherskill)
- Soft skill (API - softkill)
-
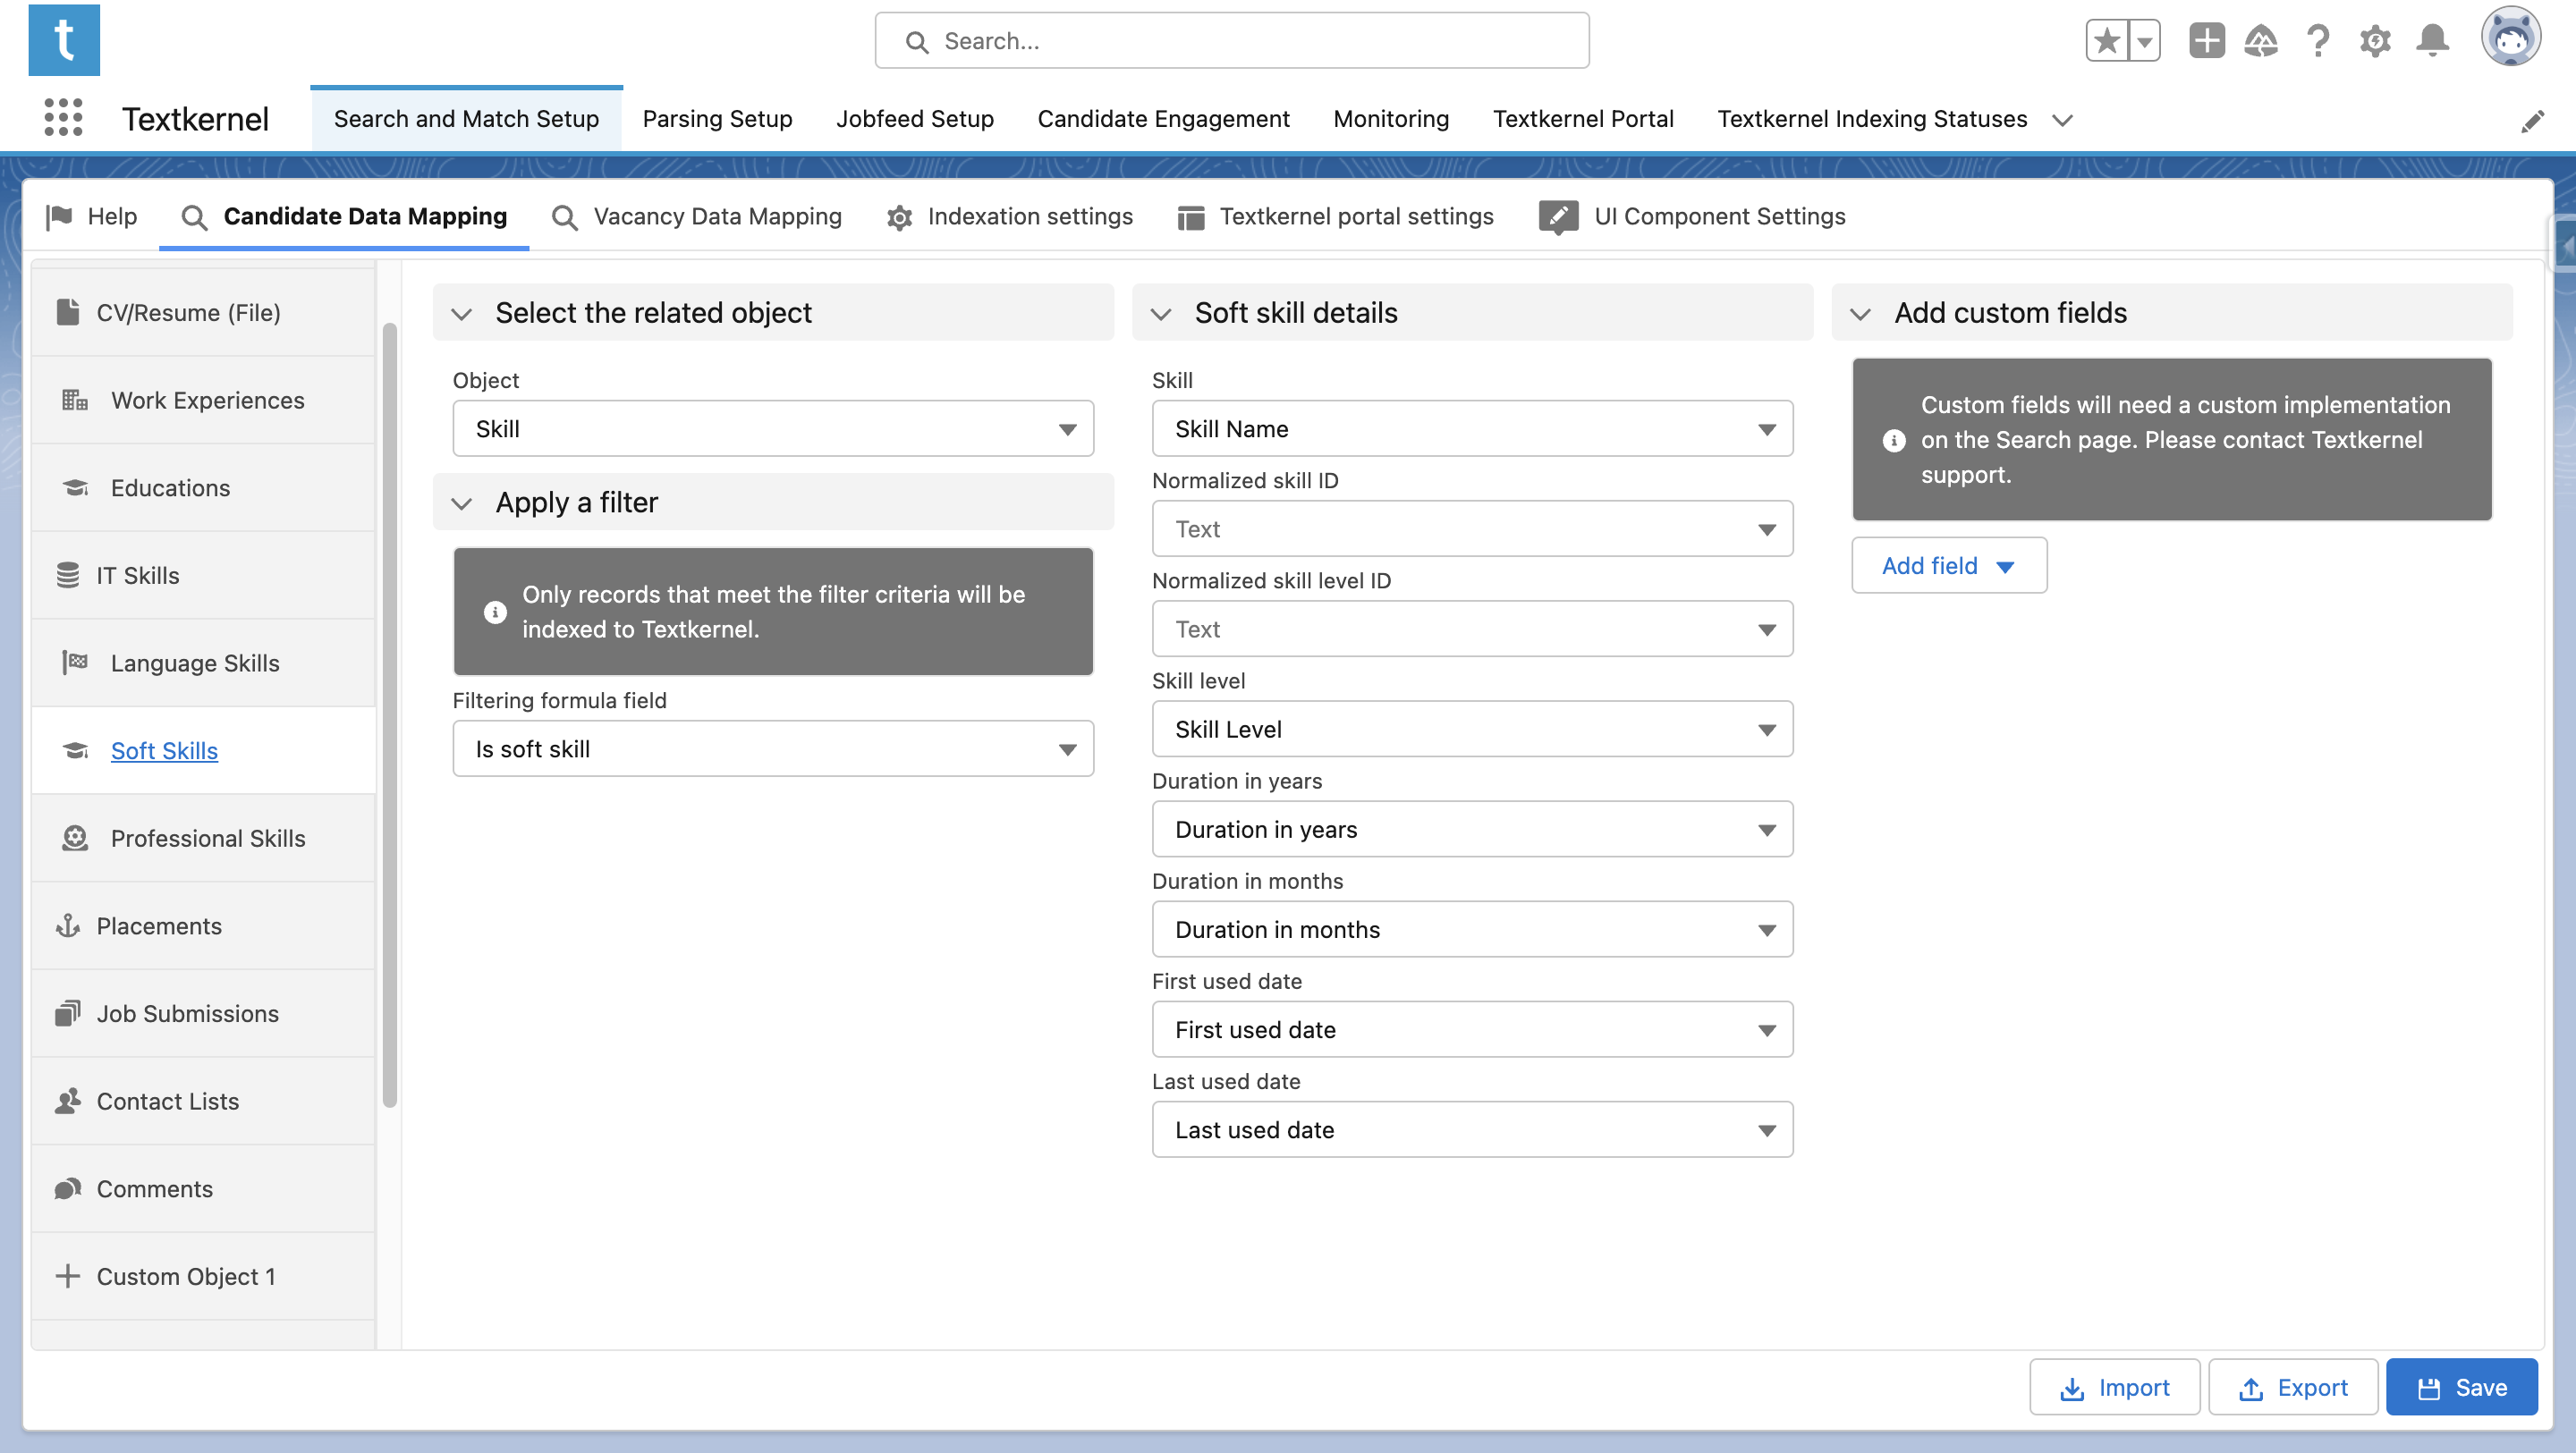
Second field type: a set of custom formula fields that evaluate to True when a records is one of the 4 skill types (e.g. Is_Soft_Skill, Is_IT_Skill, Is_Language_Skill, etc). These formulas will be used with the Apply a filter setting so that the Skill record will be mapped to the appropriate skill type.

-
After these fields have been set up, map the skills tabs under Candidate Data Mapping onto your single Skills object, and use the filtering formula fields to identify which records belong to which Skill type. Map the remaining data fields for each of the categories, too.
-
Map Vacancy data🔗
Note: relevant for both standard indexation and HTI
In addition to mapping your Candidate data model, you also need to map your Vacancy data model to the standard Textkernel data model. This process is very similar to the one for setting up the Primary Candidate Object, except you use the Vacancy Data Mapping page:
-
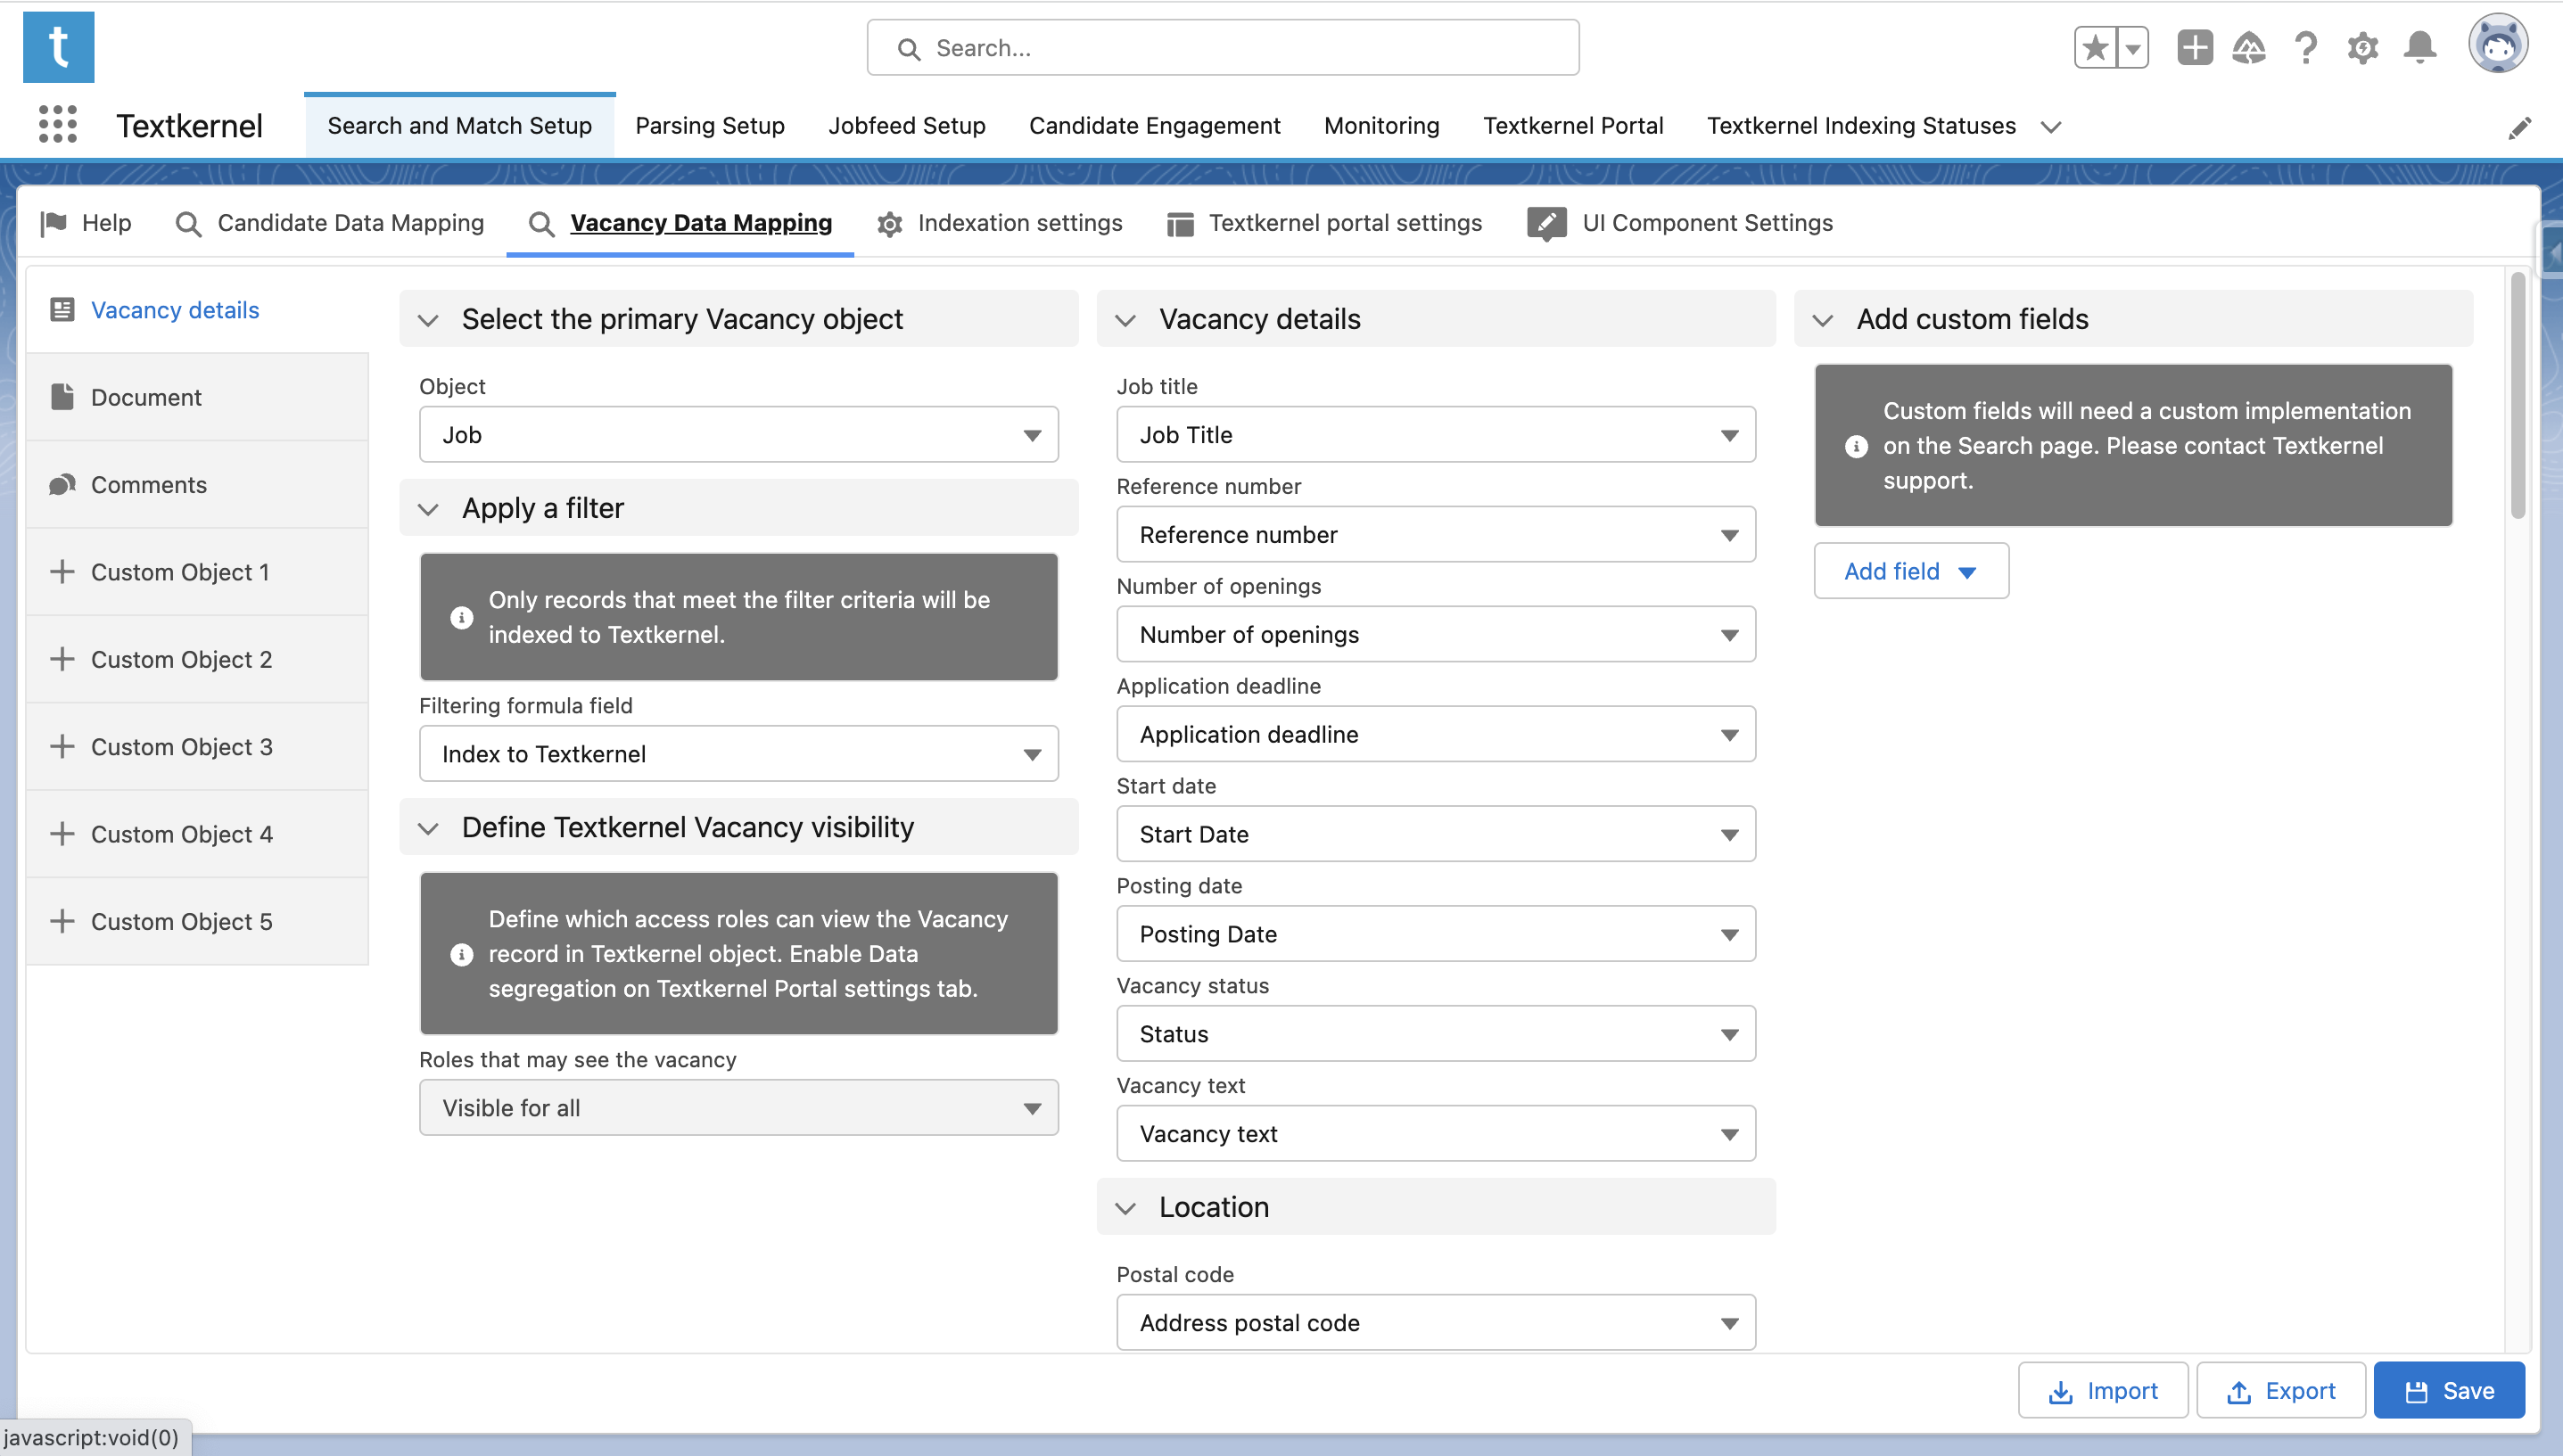
The first thing you should do is specify a primary Vacancy object. Just like on Candidate Mapping page, the primary Vacancy object is the root object. Select it under Select the primary Vacancy object.
-
You may also filter records that should be indexed to Textkernel. In order to do this, create a Boolean formula field that returns True if the record needs to be indexed. Then select this field in the Apply a filter section. Only records that meet the filter criteria will be indexed to Textkernel (see section 2 of Configure Textkernel App for more information).
-
If you use data segregation, you may also select the field controlling who has access to the Vacancy records in Textkernel. (See section 3 of Configure Textkernel App for more information).
-
After the main Vacancy object is defined, you can map remaining related fields and objects from your organization into the standard Textkernel data model.
-
The Document tab works in a similar way as the CV/Resume (File) tab for Candidate Data Mapping page. This related object represents a binary or text attached file containing the vacancy description.
-
The Comments tab is mapped in a similar way as it was for Candidate data mapping.
-
(Optional) If you want to index other non-standard objects related to the Vacancy in your data model, there are 5 additional custom object relationships that are supported.
Exporting and importing your data mapping🔗
When managing different sandbox and production environments, you want to be able to reuse your Candidate and Vacancy data mapping to quickly configure new orgs. To enable this, you can export the mapping to a file, and then import the mapping to quickly configure the mapping for a different Salesforce org. This saves time so that you don’t need to manually re-enter the mapping configuration each time.
This feature will not work if the data model is different between the two orgs. If you need to alter the Salesforce data model, first do the import, then change the data model afterwards.
Indexation Settings page🔗
Note: relevant for both standard indexation and HTI
The Indexation Settings page is where you configure and monitor your recurring processes that index data from Salesforce into TK to keep the Textkernel index synchronized with Salesforce.
-
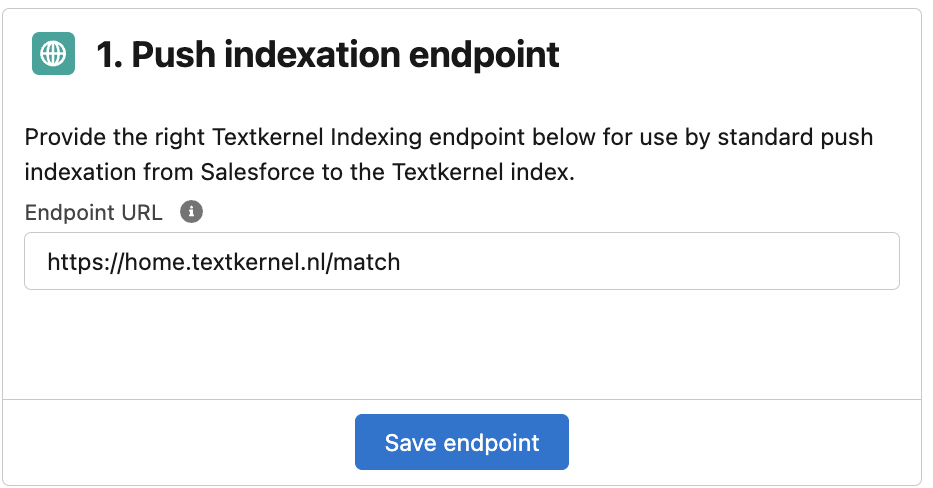
Go to Textkernel App → Search and Match Setup → Indexation Settings tab
Define the Indexing endpoint (this information will be provided by Textkernel support)
-
Add Textkernel endpoint domains to Remote Site Settings. You should add the following domains (check with Textkernel support for the correct values):
- Extract Indexing:
https://staging.textkernel.nl - SSO / user search policies:
https://sso-staging.textkernel.nl
Go to SFDC setup → Remote Site Settings → New Remote Site button → Fill the form → Save
- Extract Indexing:
-
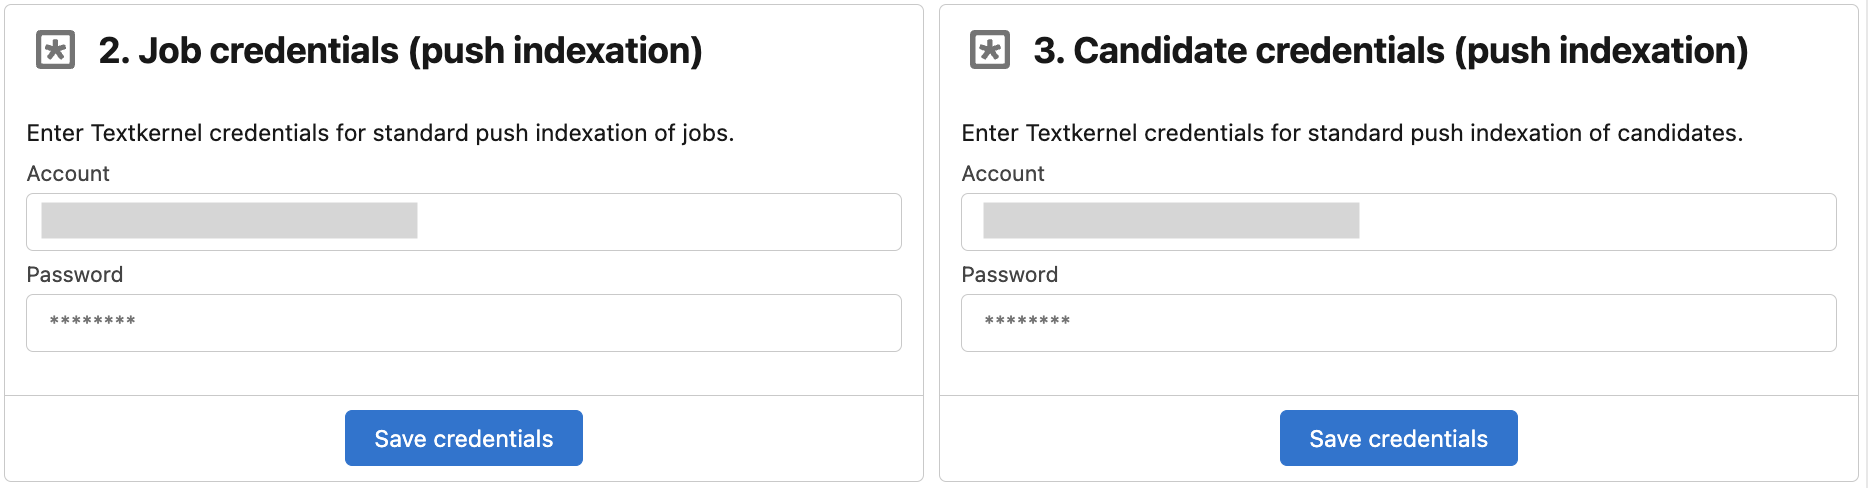
Enter credentials for the admin user of the Textkernel environment for indexing vacancies and candidates. You will receive these from Textkernel support.
-
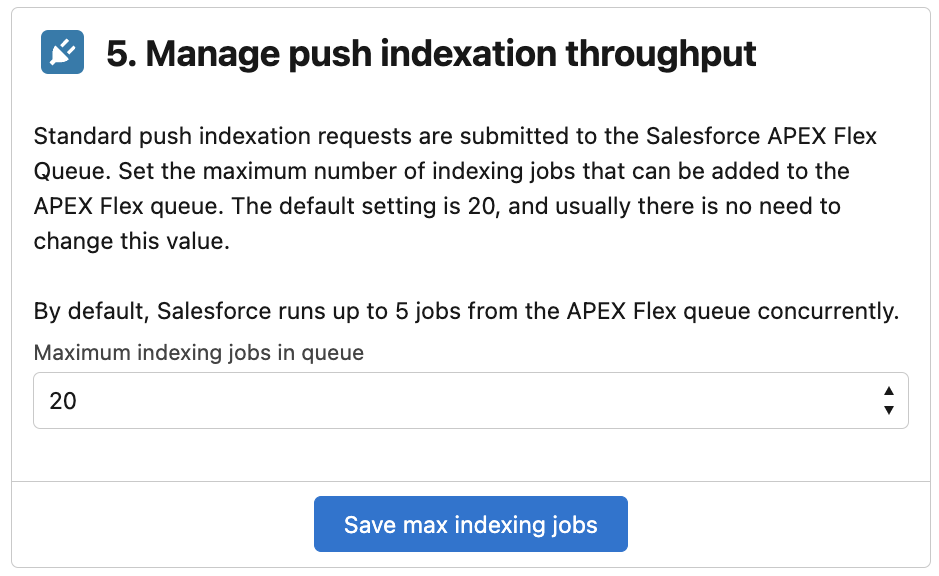
(Optional) Manage indexation throughput
The indexation process submits requests to the Salesforce APEX Flex queue, which is a shared resource for APEX jobs running in your Salesforce instance. If you want to restrict how much of that queue will be used by the indexation infrastructure, you can use this setting to limit how many jobs will be added to the queue. Usually it is not necessary to change this, but if you have a lot of other processes using the queue, you might want to adjust this setting.
Triggers to synchronize changes in Salesforce to Textkernel's search index🔗
Note: relevant for both standard indexation and HTI
To keep Textkernel's index in sync with Salesforce, a record synchronization needs to happen whenever new records are created, or existing records are updated and/or deleted. In your Salesforce environment, you will need to add a set of triggers that fire when the relevant Salesforce records change. The triggers can be setup using Salesforce Flow or custom APEX code, depending on your preference.
The package contains a pair of invocable classes: Delete record from Textkernel index and Upsert record to Textkernel index which can be used to create or update Textkernel Indexing Status records for Vacancies and Candidates. Your triggers simply need to call these invocable classes when appropriate. Both of these invocable classes share 1 parameter:
- Record Id: this is the record ID of the primary record (Candidate or Vacancy). So, when these classes are invoked because a change on a relevant child record, this id refer to the related primary record, (i.e. something like
{!$Record.Candidate__r.Id}or{!$Record.Vacancy__r.Id}).
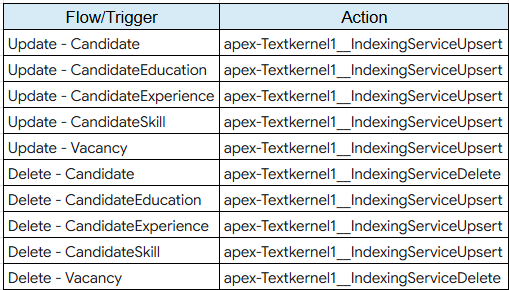
For each object used in your Candidate and Vacancy data mapping, you need to set up automations: some handle the upsert operations, and some handle the delete operations. After doing this and activating the automation, all changes in Salesforce will get automatically synchronized to Textkernel’s index.
You can use the Salesforce Flow automation to handle this configuration requirement. It is also possible to call them from APEX code if you have a more complex environment. Below are some examples of setting up the Flows.
There are several specific scenarios to consider with the automation:
Automation to upsert records to the Textkernel index🔗
These scenarios should be covered using Upsert record to Textkernel index:
- Creation of a new record, which satisfies the filter criteria for indexing → action is to upsert the record into the Textkernel index
- Update of an existing record, with static True value on filter criteria → action is to upsert the record into the Textkernel index
- Deletion of a child record of the primary Candidate/Vacancy record (e.g. Work History item), which satisfies the filter criteria for indexing → action is to upsert the primary Candidate/Vacancy record, which will update the whole record including the removal of the deleted child record
- Transition on the filter criteria value of a record, where it was not indexed before, but now it meets the filter criteria for indexing → action is to upsert the record from the Textkernel index
Automation to delete records from the Textkernel index🔗
These scenarios should be covered using Delete record from Textkernel index
- Deletion of an existing primary Candidate/Vacancy record, which satisfies the filter criteria for indexing → action is to delete the record from the Textkernel index
- Transition on the filter criteria value of a record, where it used to be indexed, but no longer meets the filter criteria for indexing → action is to delete the record from the Textkernel index
Below overview describes the required action for each trigger:
Important
To minimize unnecessary indexing activity, the Flow upsert triggers should check to see if there was a field transition on a relevant (mapped) field rather than always updating the TK index on any field change on the triggering record. If an unmapped field changes there is no need to reindex the record into TK.
Important
The example below is illustrative, and does not cover all the scenarios required to maintain correct and efficient data synchronization.
Example trigger configuration: Flow on record upsert🔗
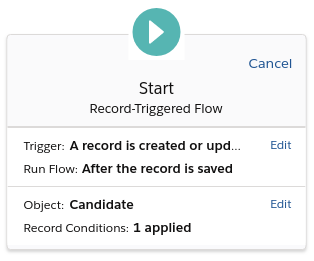
- SFDC Setup → Flows → New flow button → Select Record-triggered flow → Press Next button →
- Configure trigger: Select A record is created or updated and After the record is saved → Click Done
-
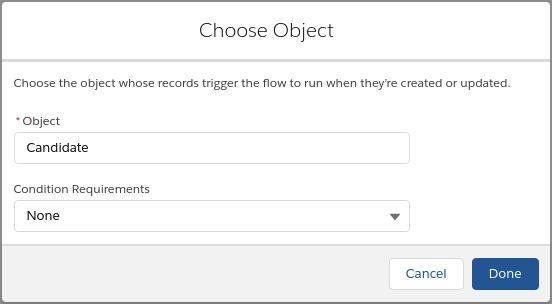
Click Choose object → Select candidate object (object that is used as Candidate) → Select -None- in Condition Requirements field → Press Done button
-
Add Action to the screen → Set up Action: Textkernel section → Select “Upsert record to Textkernel index” → Set Input values: Record Id -
{!$Record.Id}→ Press Done button → Activate the flow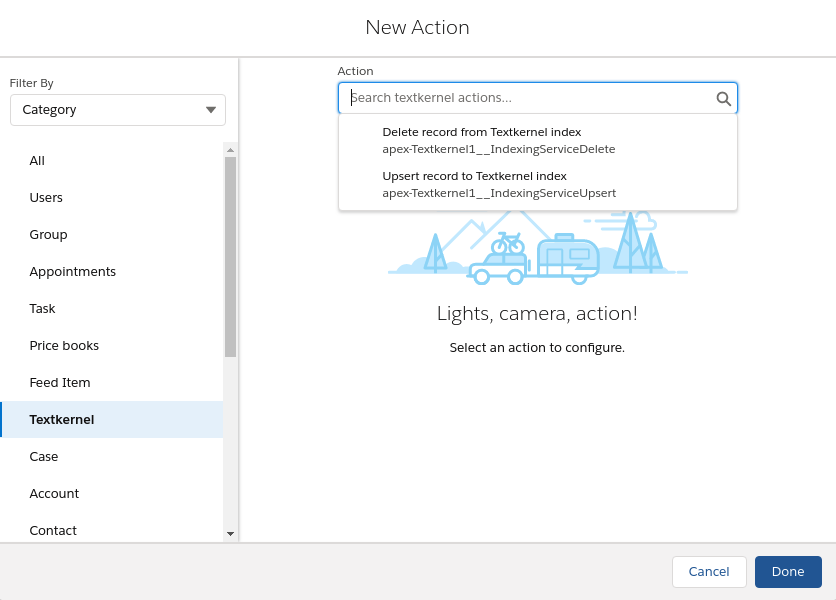
Package trigger to handle changes on the CV/Resume binary file🔗
The File (typically a ContentVersion, but sometimes the old Salesforce Attachment object) are a special case, because it is not possible to create a Flow trigger for them. Because of that, we have included an APEX trigger in our package that synchronizes changes on these Files to the Textkernel index.
In some cases you may prefer to disable Textkernel's trigger and write your own custom APEX trigger (for example to integrate it better with other trigger logic on the File object). In this case, the Salesforce admin can disable the trigger in the package using the custom code settings.
Important
Usually you should not change these settings, but this is a special case that requires it.
The procedure to disable the CV/Document update trigger is as follows:
-
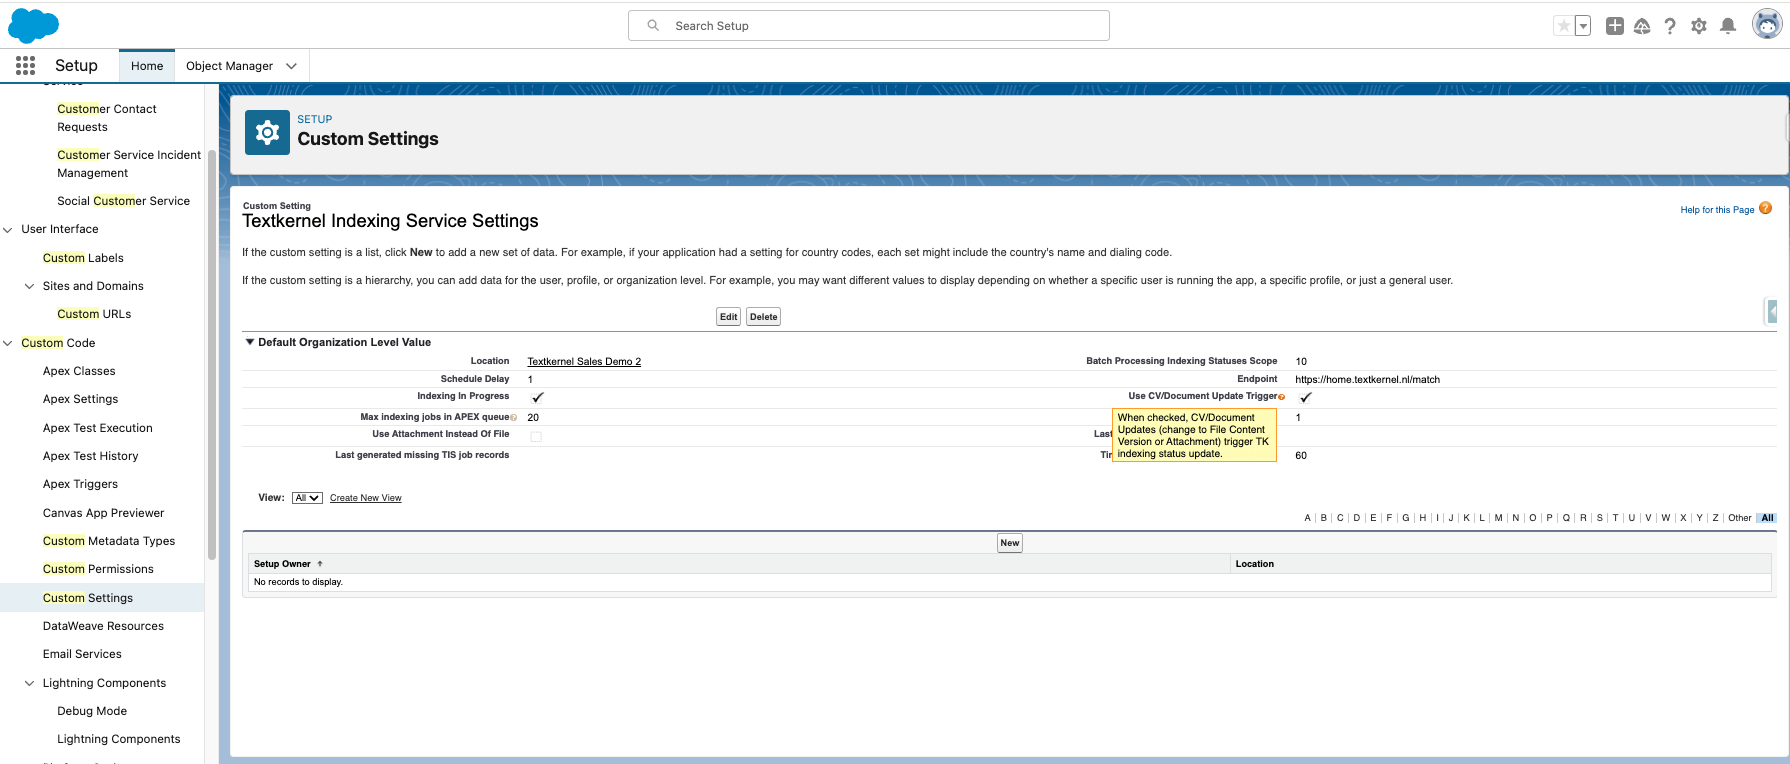
Navigate to Salesforce Setup -> Custom Code -> Custom Settings
-
Click Manage next to Textkernel Indexing Service Settings.
-
Click the edit button so that you can update the settings.
-
On the screen, remove the tick in the checkbox Use CV/Document Update Trigger.
-
Save your change
Fast Vacancy Indexation🔗
Sometimes there are situations where you want to quickly index a job and get match results without waiting. For example, when an interactive user has just created a new Vacancy and wants to quickly see match results rather than waiting for the normal indexation wait time of a few minutes.
To support this scenario, there is an optional fast vacancy indexation feature. This feature is for advanced integrations where the admins have a deep understanding of their Salesforce technical infrastructure. The Apex method Upsert record to Textkernel index has an additional optional parameter:
- handleImmediately: this is a boolean value. When set to True, the TK indexation request will happen immediately rather than waiting for the scheduled indexation job. This parameter is only available for Vacancy records, not Candidate records.
If you are calling the method from a Salesforce Flow trigger, then activate the parameter and set it to the global True value: {!$GlobalConstant.True}
When the fast indexing operation finishes, it fires a Platform Event to notify the system that the fast indexation operation finished. These events are visible in the Platform Event monitoring panel, and its logs.
Important
Your Flow/Apex trigger should not simply call the fast vacancy every time that you create or update a Job. This feature puts the fast indexing request in front of the queue. So, if it is used too much, it will block other indexation requests. Most job indexation operations should still be normal updates. In implementing this feature, you should have some decision logic to determine when the fast action is really needed. For example, you might trigger fast indexation only when creating a new Job record for the first time in an interactive user context. Also, only critical field changes should trigger an update, such as: Job Title, Job Description/Requirements, and/or Job location.
Initialize indexation🔗
Note: relevant for both standard indexation and HTI
After the process automation discussed in the previous section has been set up for the primary Candidate/Vacancy object and all the related objects used in your data model, now you are ready to start indexing data into Textkernel. However, before that, first you need to do a one-time initialization to create any missing Textkernel indexing status records.
- Go to the Textkernel App → Search and Match Setup → Indexation Settings tab
-
On the Indexing status section, click Generate missing records to generate any missing indexing status records.
This batch will create the records for any existing candidates and vacancies in the organization (which meet the filtering criteria). Now that you have created and activated the Flow or Process automation, indexing status records will be created automatically whenever a new Vacancy or Candidate record is created. Also, whenever Vacancy or Candidate records and their related records are updated or deleted, the associated Textkernel indexing status record will be set with the “To be indexed” status.
Now we are ready to start a recurring, scheduled indexation job to import Vacancies and Candidates into the Textkernel search environment. This job periodically checks for records with the “To be indexed” status, and indexes them to Textkernel, so that up-to-date data is available for recruiters.
Start updating the Textkernel index (standard push indexation)🔗
Note: only relevant for standard indexation, not HTI
- If you are using standard indexation, go to Textkernel App → Search and Match Setup → Indexation settings tab
- Define how often to synchronize to the Textkernel index (or use default)
- Press the Schedule indexation button
Configure and start the high-throughput pull indexation🔗
Note: only relevant for HTI, not standard indexation
-
Configure the OAuth 2.0 Connected App
This feature uses a Salesforce Connected App to implement OAuth 2.0 so that Textkernel's backend platform can authenticate to Salesforce APIs. The setup procedure is documented in Configure Connected App and Automation API Webhook within the Basic Textkernel Connector setup guide within this Admin installation guide.
As part of that procedure, you will configure the integration user and provide the following information to Textkernel:
-
OAuth 2.0 Consumer Key
- OAuth 2.0 Consumer Secret
-
OAuth 2.0 Token URL
Note: It is important that the integration user is configured to access all the data objects and fields (ie relating to candidates and jobs) that are mapped for indexation.
-
Once the above is configured and you have provided the OAuth 2.0 information to Textkernel, ask Textkernel to turn on the high-throughput indexation.
Schedule job to reset stuck indexing status records🔗
Note: relevant for both standard indexation and HTI
In some unusual situations, a Textkernel Indexing Status record could be stuck with a "Submitted for ..." Status. The integraion has a feature where a job can be scheduled periodically to reset these stuck records automatically. When this happen, an error is logged, but if the error is recoverable the data will continue to index.
- Go to the Textkernel App → Search and Match Setup → Indexation Settings tab
- Go to the panel 7. Schedule indexing status reset
- The default value is usually fine, but you can change the minutes between executions if you want to. You must wait at least 60 minutes between executions.
- Press the Schedule button. An APEX job is scheduled.
(Optional) Index CV/Resumes stored outside Salesforce🔗
Note: relevant only for HTI
To reduce storage costs in Salesforce, some Salesforce ATSes offer a feature to save the Candidate's CV / Resume files outside of Salesforce (e.g. in AWS). This approach reduces the overall data storage costs.
If this architecture is used, the ATS owner implements custom functionality outside of Textkernel's integration to:
- Enable a recruiter to upload the CV/Resume for a candidate into Salesforce and move it to the off-platform storage
- Implement viewer so that the recruiter can see an image the off-platform CV/Resume inside Salesforce when needed (eg on the Candidate record page)
- A standard file retrieval protocol allowing the Textkernel integration to retrieve the off-platform CV/Resume file (see next section)
Off-platform file retrieval protocol🔗
The Textkernel integration supports a standard flexible protocol to retrieve the off-platform CV/Resume file. When that protocol is implemented by the ATS then Textkernel can retrieve the off-platform files as part of the indexation process.
The solution is composed of the Salesforce platform, the ATS customization on top of Salesforce, and an off-platform storage system, which interact with the Textkernel integration.
This sequence diagram illustrates the protocol in use by TK Connector HTI pull indexation:
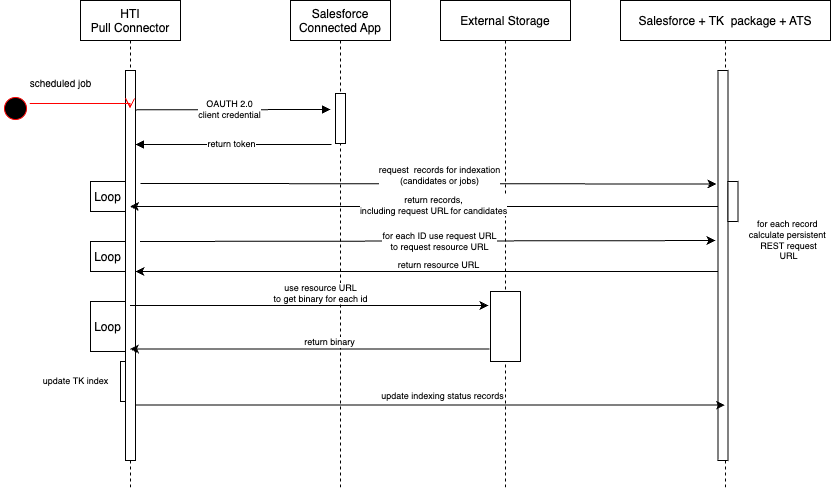
The solution (outside of the Textkernel integration) must provide 2 URLs/endpoints:
1 (Persistent) Request URL/endpoint:
A custom endpoint on Salesforce, that can be called from outside Salesforce to retrieve a resource URL. Salesforce's standard "Connected App" feature should be used for authentication, and specifically the OAUTH 2 client credentials grant flow should be supported. It should be possible to compute this unique request URL given the unique/relevant Salesforce object ID.
If the Candidate has a related child object (eg called a "Document"), and that object is uniquely mapped 1:1 to the off-platform CV/Resume document, then the Salesforce Document ID could be used to create a unique request URL. So, for example, something like the below would work as the endpoint naming convention to get the resource URL from the request URL/endpoint:
https://ats-specific-salesforcedomain/something/${Salesforce Document ID}/somethingelse
https://ats-specific-salesforcedomain/other/${Salesforce Document ID}
2 (Temporary) Resource URL:
A temporary, pre-signed URL, that can be called from outside Salesforce to retrieve the binary file from the external system. This resource URL is provided as the response of the request URL/endpoint. The resource URL should not persist for an unlimited time period for security reasons.
It is important that these endpoints and URLs can support a high request load for stability. (Eg, Textkernel might make 30 simultaneous concurrent requests against each of these URLs).
Configure indexation with off-platform CV/Resumes🔗
Given the ATS has implemented the above custom features, the Textkernel HTI indexation architecture can retrieve the binary from off-platform, if the data mapping is configured with the following procedure:
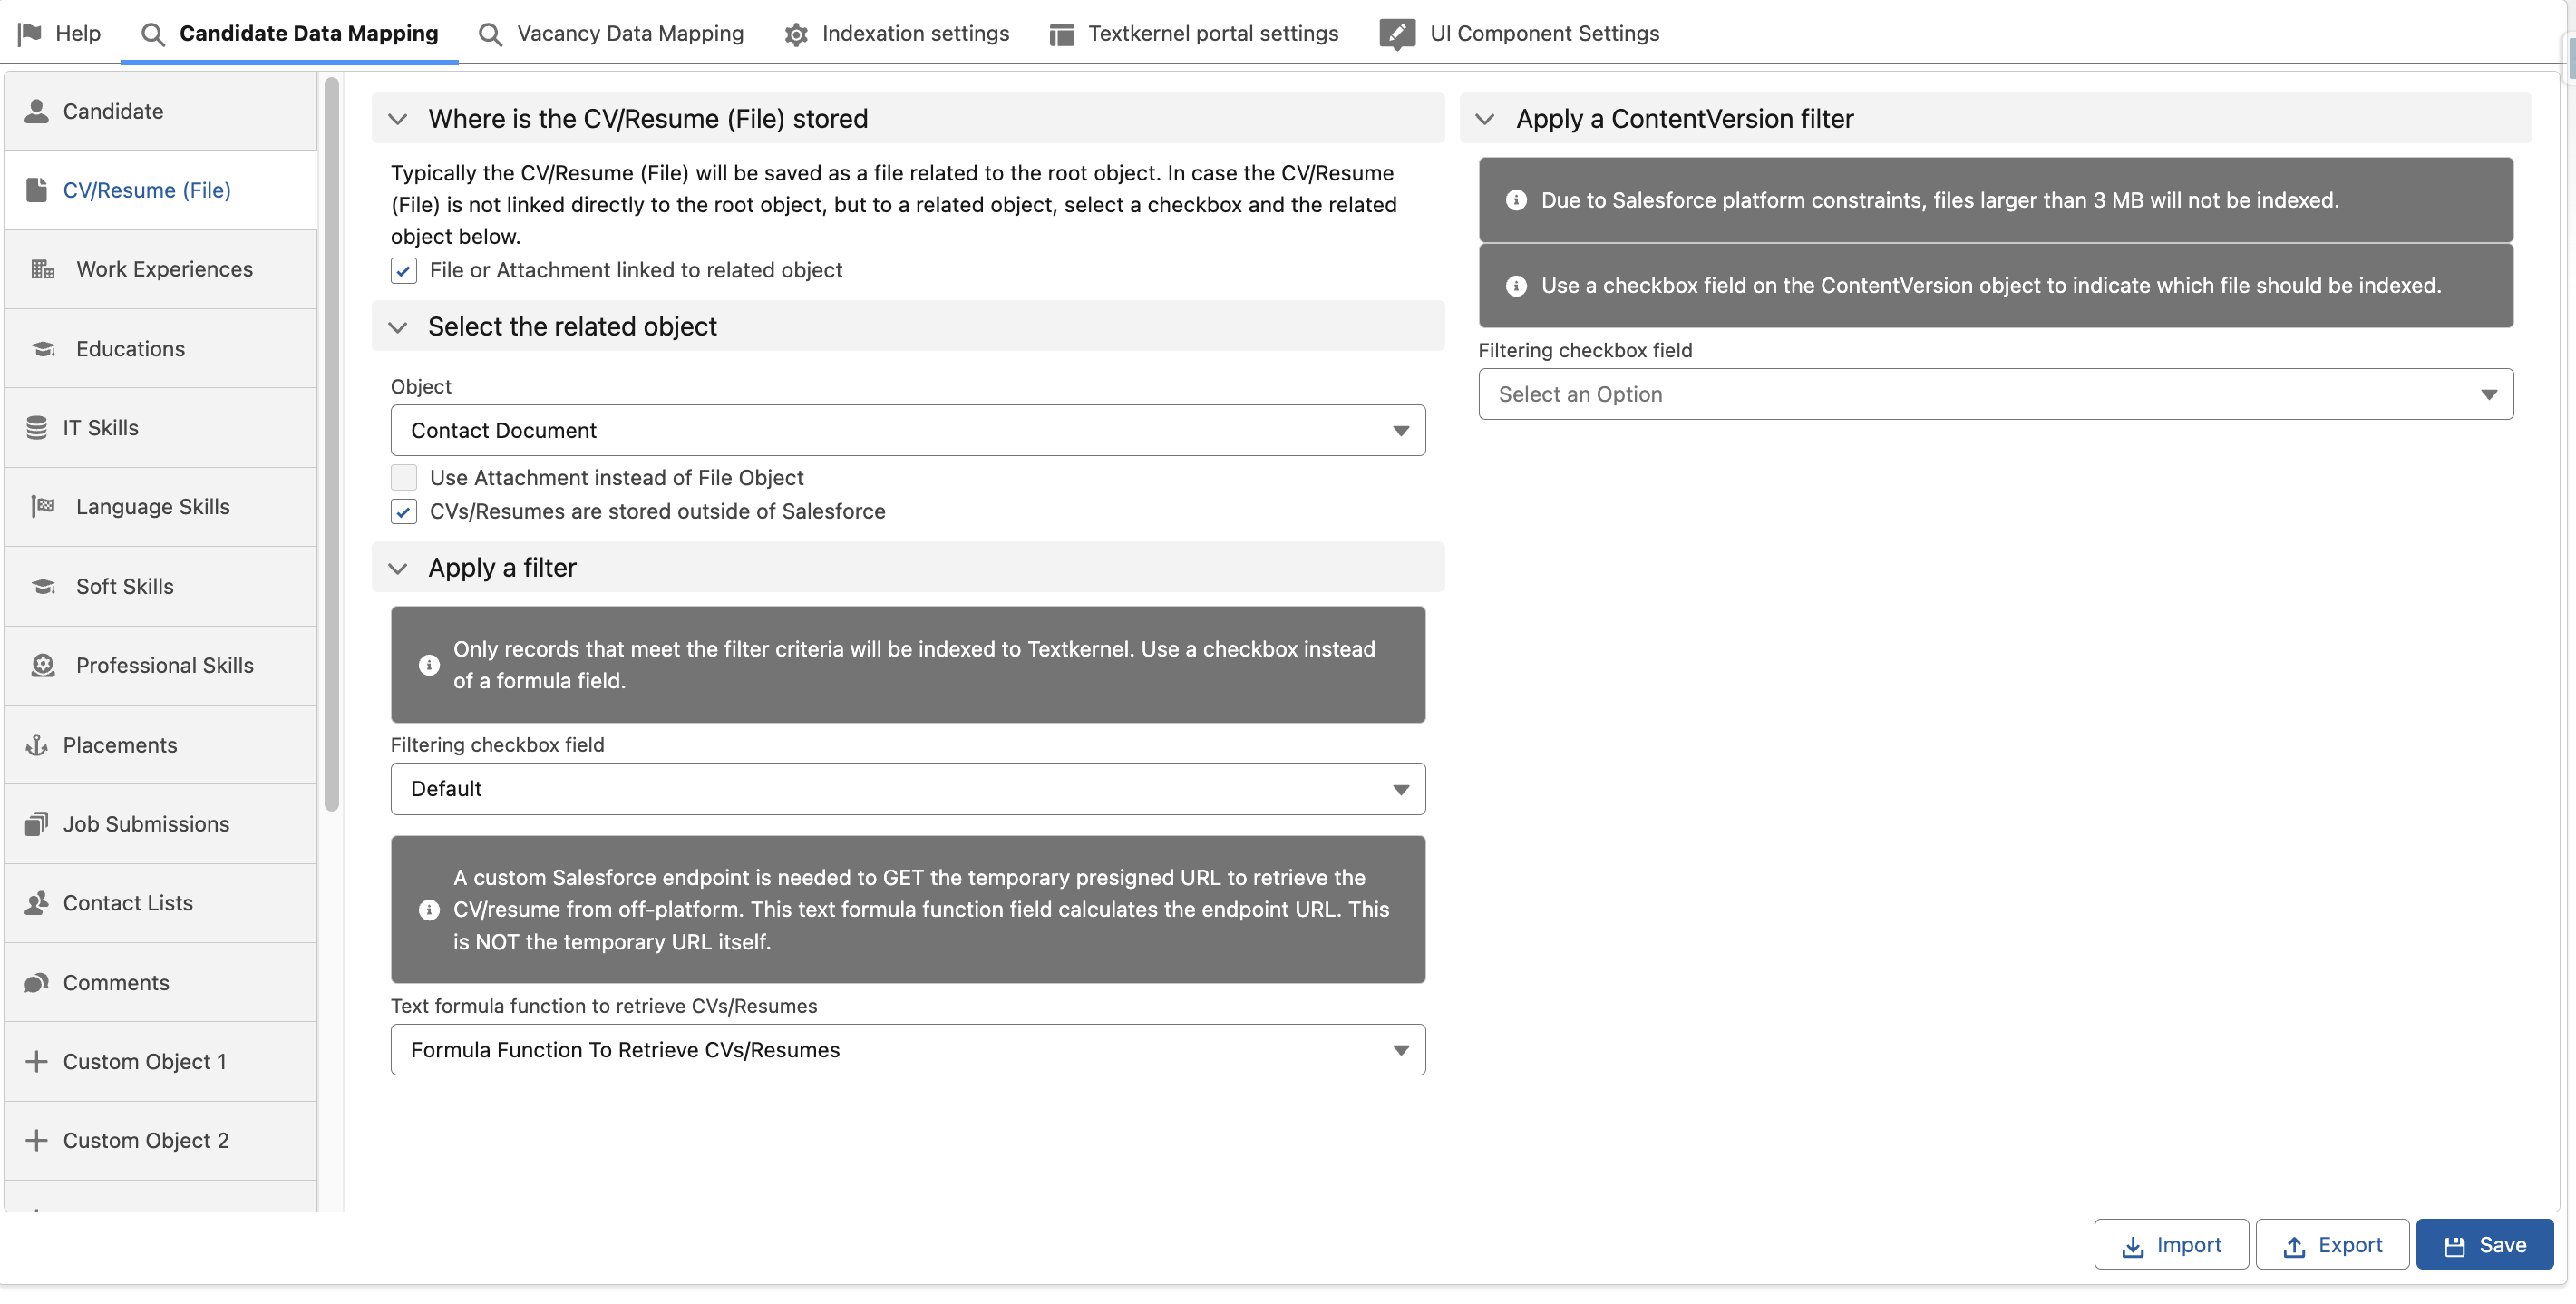
- Go to Textkernel app → Search and Match Setup → Candidate Mapping → CV/Resume (File)
- Set the checkbox to True: File or Attachment linked to related object Only this kind of CV/Resume data model is currently supported, because it has a clear 1:1 relationship between a Salesforce ID and an off-platform CV/Resume.
- Select the related object of your data model that represents a linked document
- Set the checkbox to True: CVs/Resumes are stored outside of Salesforce
- Select a filtering checkbox field in your data model. This feature needs to be used with this "Related Object" data model to indicate which specific related record is the one CV/Resume for indexation
- Define/create a formula field on your related object that calculates the retrieval endpoint, and returns it as a text field
The value in this field will be used by the Textkernel integration to create the permanent request URL. The formula field can refer to its Salesforce record ID to calculate the unique endpoint. For ease-of-use, Textkernel will automatically prefix https:// and the org's base domain to the endpoint; you only need to include the endpoint text after the domain.
- Select your text formula function field under the drop-down: Text formula function to retrieve CVs/Resumes
- Save your changes to the mapping.
With the above custom features and indexation configuration, Textkernel will retrieve the CV/binaries from off-platform during HTI indexation.
Monitor the integration🔗
Note: relevant for both standard indexation and HTI
We provide tools so that you can monitor the indexation process and make sure that your Candidate and Vacancy records are properly synchronizing to Textkernel.
Go to Textkernel App → Monitoring
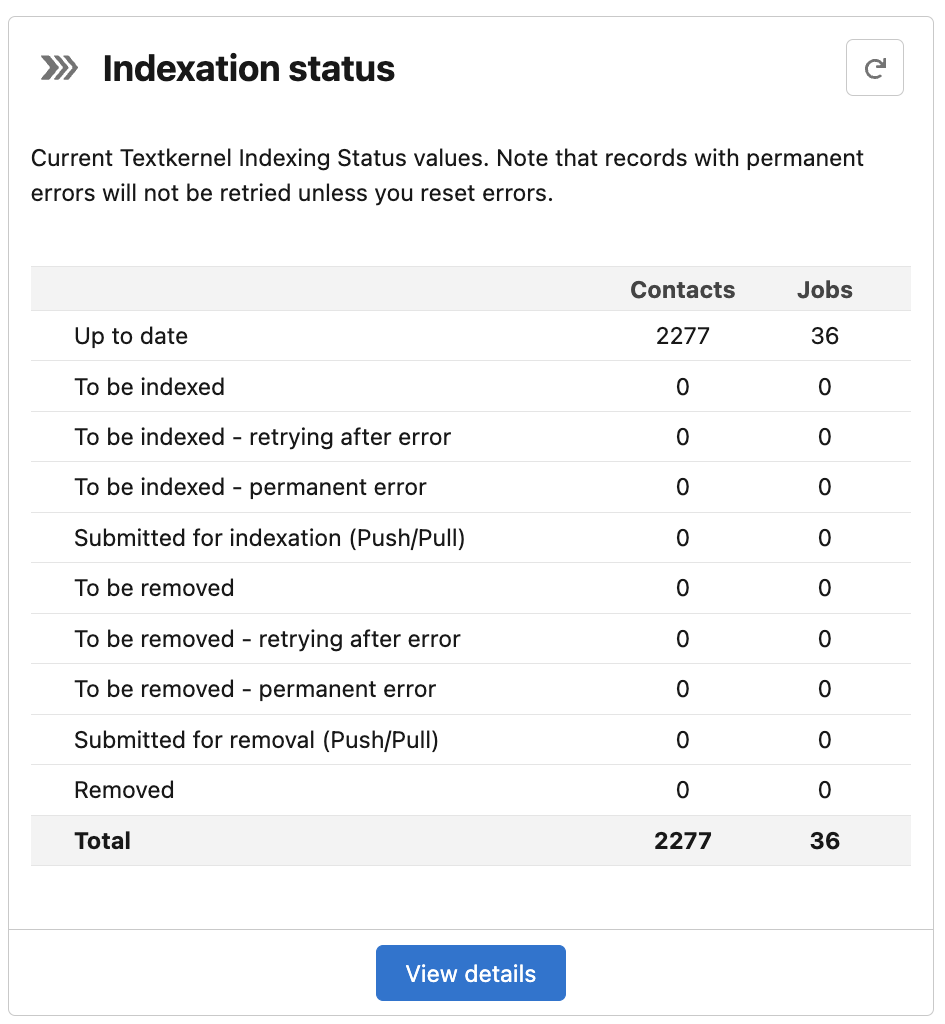
Indexation status
Here you can see a summary of the indexation status for your records. You can see if they are Up to date (synced to Textkernel), waiting to be indexed into Textkernel (because they are new or changed records), or waiting to be removed from Textkernel (because they have been deleted from Salesforce and you want them removed from Textkernel, too).
The integration will automatically retry a failed indexing attempt 3 times, before marking it as a permanent error. Permanent errors could be caused, for example by corrupted CV binaries that are simply unparseable.
If you want to see the detailed status, click on the View details button. You can also easily reset the errors by clicking on the Reset errors button, and the integration will automatically attempt to re-index the failed records.
Info
More details about monitoring indexation (and how it works) are provided in the Operational Guide